
Moldcell Virtual PBX (Moldova) is a modern way to organize corporate telephony. The virtual PBX helps you handle all incoming calls, set up a voice greeting and smart call distribution between employees, view call history and listen to recordings, get call statistics, and more.
You can learn more about Moldcell Virtual PBX at: https://www.moldcell.md/rus/PBX.
Altegio + Moldcell Virtual PBX integration capabilities #
With the integration, you will be able to:
- Add a new client to the database and schedule their visit directly from the pop-up card while continuing the conversation;
- When answering an incoming call, address a regular client by name, schedule the next visit or edit an existing one, saving time on searching for the contact in the database, and also open the client card in one click from the pop-up card;
- Listen to recordings of conversations with clients in the Altegio interface to recall communication details.
Integration setup instructions #
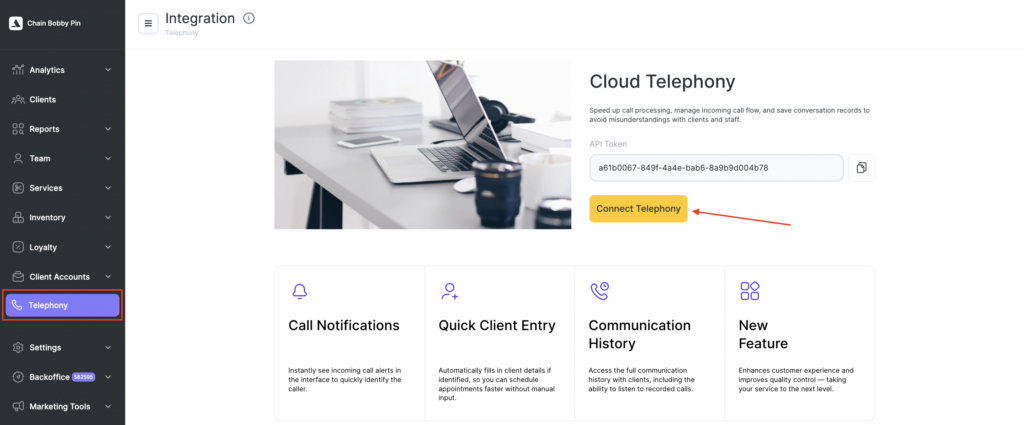
- Go to the chain interface > Telephony section and copy the token.
- Open the Moldcell Virtual PBX interface. In Settings, select CRM integration. Find the Altegio widget and click Connect.
- In the window that appears, paste the token you copied earlier. Click Connect. The integration setup on the Virtual PBX side is now complete.
- Return to the Altegio interface. The integration status will now show Connected. In the left-side menu under Telephony, four new sections will be available: Integration, Routing, Routes, and Calls.
- Go to Routes. You will see that a Route for all users is created by default. Click the pencil icon in the Actions column and configure it for your needs.
- In the window that opens, give the route a short name, for example Chisinau location or Sales department. Then select the users and locations that will receive incoming calls, and choose where to store call history:
- Chain call history — calls are saved under Telephony > Calls; only the chain manager/owner can view the history;
- Chain and all locations call history — the history is saved both under Telephony and under Reports > Call Logs; call logs are available to the chain manager/owner and location managers;
- Chain and notified locations call history — calls are stored under Telephony and under Reports; the history can be viewed by the chain manager/owner and only the managers of the specified location.
- At the bottom of the route settings window, click Save.
- Next, link the created route to the number that should receive calls. In the Telephony menu, select Routing. Open it and click Add rule.
- In the settings, specify:
- Routing type. If calls should come to the company’s main number, select Phone. If the call should be received by a specific employee or department, select SIP.
- Identifier. If Phone was selected, enter the phone number without a plus sign, spaces, or hyphens. If SIP was selected, enter the internal three-digit extension of the employee or department.
- Call route
- Click Save.
In the same way, you can create any number of routes and rules for your numbers.

