
In Altegio, owners and managers can control who can view or change data in the system (clients, bookings, cash desk, schedules, etc.). With the updated subscription logic (the “paid rights” model), a team member’s subscription status depends on what they can do in the system — not just their job title.
Proper access setup helps your team work smoothly while keeping sensitive business data protected.
Key terms #
Billable team member (counted in the subscription). A team member is considered billable if at least one of the following applies:
- they provide services and have a work schedule assigned
- their role includes any editing permissions
Non-billable team member (not counted in the subscription limit). A team member is considered non-billable if:
- they do not have a work schedule
- they have view-only access (no permissions to create/edit/delete)
Team member roles
Altegio offers 8 roles with a preset set of permissions for quick setup:
- System Manager — team and license management (free access).
- Read-only — view-only access, no editing permissions (free access).
- Owner — full access.
- Manager — manages a branch/location.
- Receptionist — works with appointments and payments.
- Call Center — helps clients and books services.
- Accountant — payroll and finance management.
- Team member — provides services and has access to their schedule.
Where to manage roles and access #
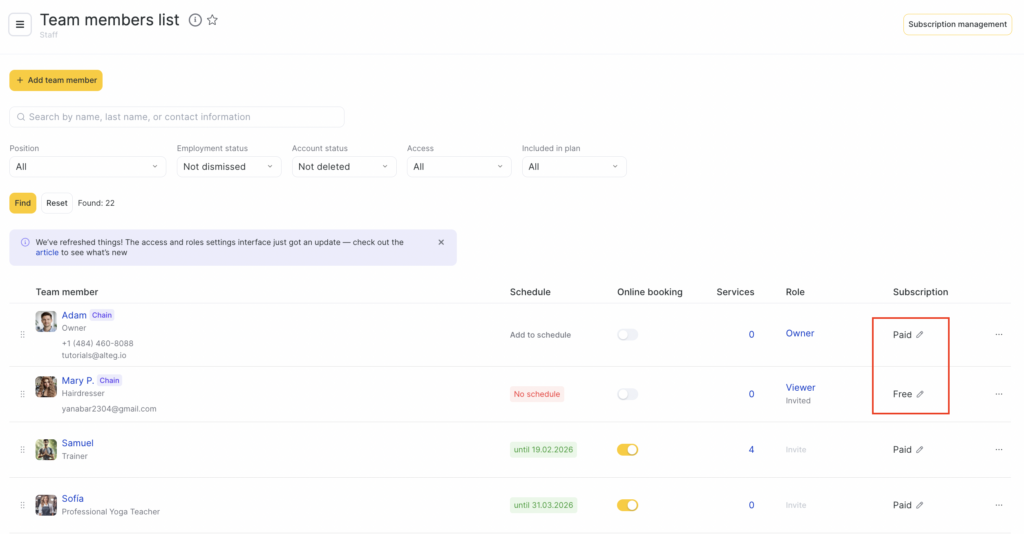
You can manage team member roles, access rights, and whether they are counted in the subscription in Settings > Team. Specifically, here you can:
- add a new team member
- assign an access level
- delete and dismiss team members
- transfer access from one team member to another
- search and filter team members
- see for each team member: Schedule, Online Booking, Services, Role, and subscription status
- open a team member profile to assign services, set up availability for online booking, define payroll calculation rules, configure the work schedule, notifications, access rights, and additional settings
Add a new team member #
- To add a new team member click Add team member (top-left).
- In the Add new team member window and fill in:
- Name
- Specialization (e.g., cosmetologist). The team member’s specialization will be visible to clients in the online booking.

- Under Team member settings, choose one option:
Billable team member. Choose this if the team member will be included in the schedule and/or needs editing permissions.
Then enable Altegio access if they should be able to log in (their actual access will depend on the permissions you assign). Enter the phone number or email address where the team member will receive the invitation, and set the role.
Important
If you don’t have an SMS aggregator connected, the invitation won’t be delivered to a phone number. In this case, we recommend using an email address.
Non-billable team member. Choose this if the team member is not included in the schedule and only needs view-only access in the system and/or team & subscription management. They won’t be counted in the subscription limit.
Then enable Altegio access if they should be able to log in (their actual access will depend on the permissions you assign). Enter the phone number or email address where the team member will receive the invitation, and set the role.
Important
If you don’t have an SMS aggregator connected, the invitation won’t be delivered to a phone number. In this case, we recommend using an email address.
A non-billable team member can be assigned one of these access levels: Read-only or System Manager.
The team member has been dismissed. Choose this if the person no longer works with you (their access will be disabled).
- Click Save.
For more information on adding a new team member, read the article.
Set up system access and assign a role (for an existing team member) #
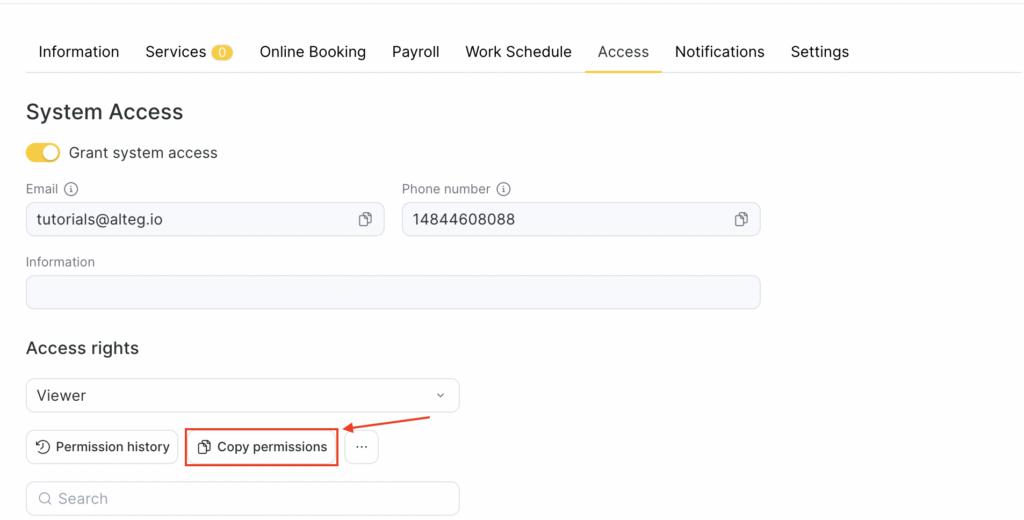
- Open the team member profile and go to the Access tab.
- In System Access section:
- Enable Grant system access
- Add Email and Phone number (used for account access)
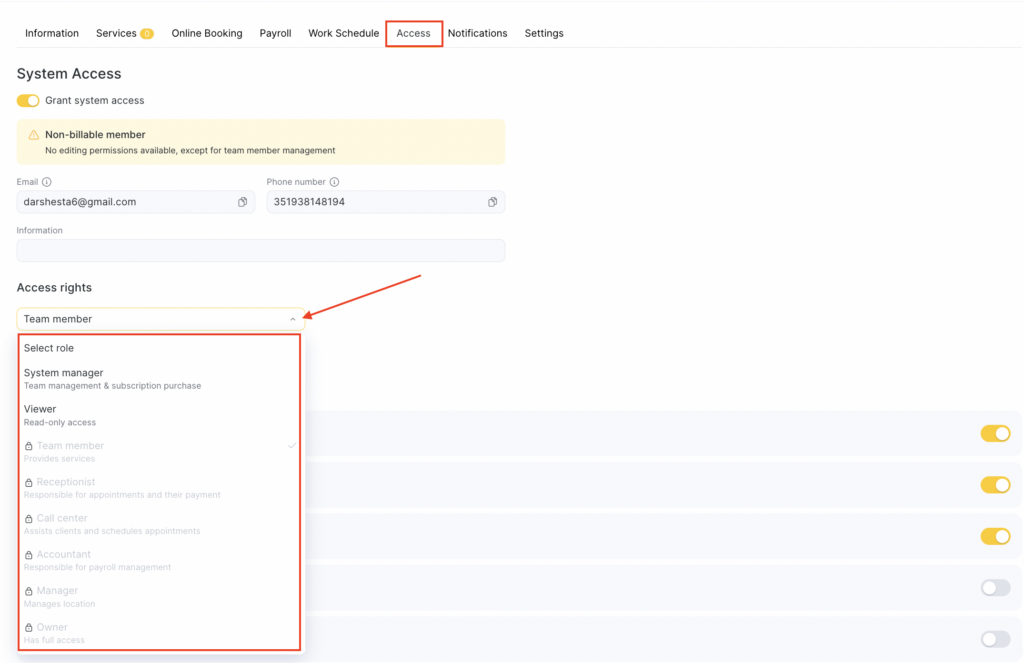
- In Access rights, select a role in the dropdown.
Important
If you don’t have an SMS aggregator enabled, the invitation will not be delivered to your phone number. In this case, we recommend providing an email address.
- In the Access rights section, select a role from the drop-down list.
Available role templates:
- System Manager — team management and license purchase.
- Read-only — view-only access, no editing permissions.
- Owner — full access.
- Manager — manages a branch/location.
- Receptionist — works with appointments and payments.
- Call Center — helps clients and books services.
- Accountant — payroll and finance management.
- Team member — provides services and has access to their schedule.
Important
Each role comes with a preset set of access rights. You can adjust the permissions in the list below by unchecking the rights you don’t need.
If you choose a role that includes any editing permissions, this team member will be counted in the subscription.
Free roles: Read-only or System Manager.
If a team member provides services but is assigned a free role, they will still be counted in the subscription.
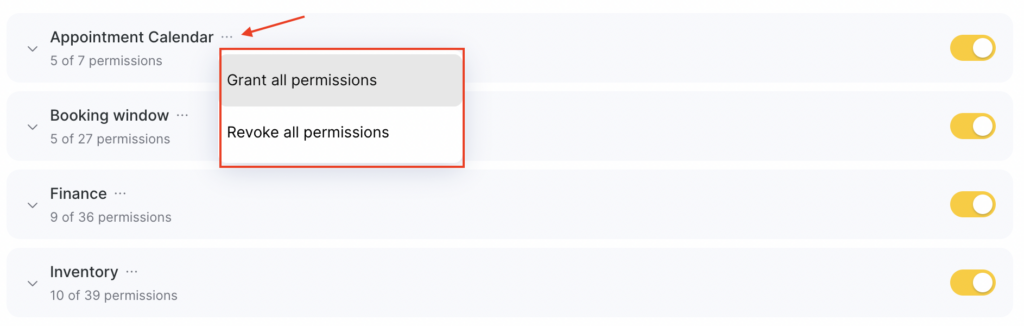
- To grant or remove permissions for a role, click the three dots in the Access tab and select the required option.
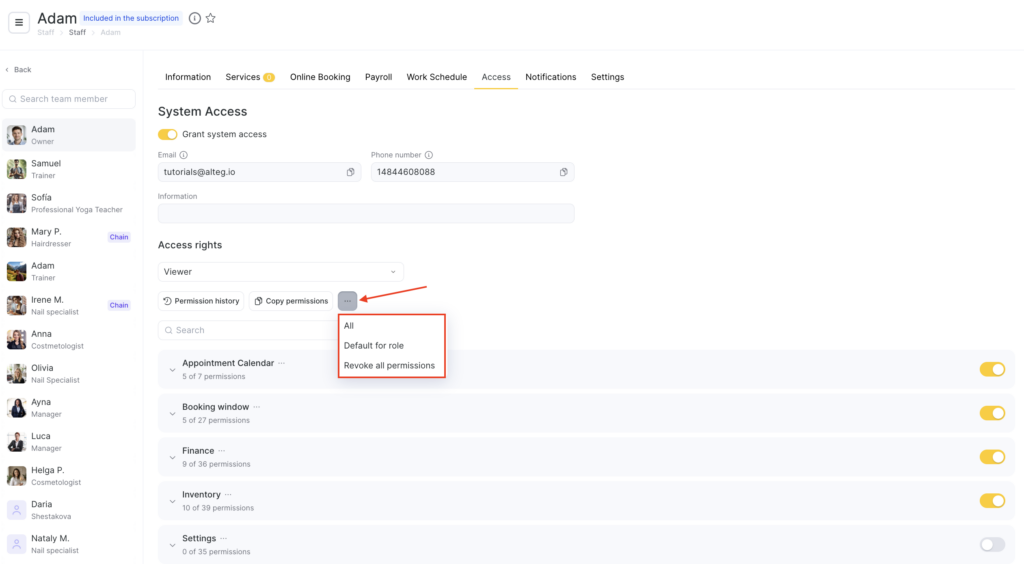
- To grant/remove all rights to a section, use the switch.

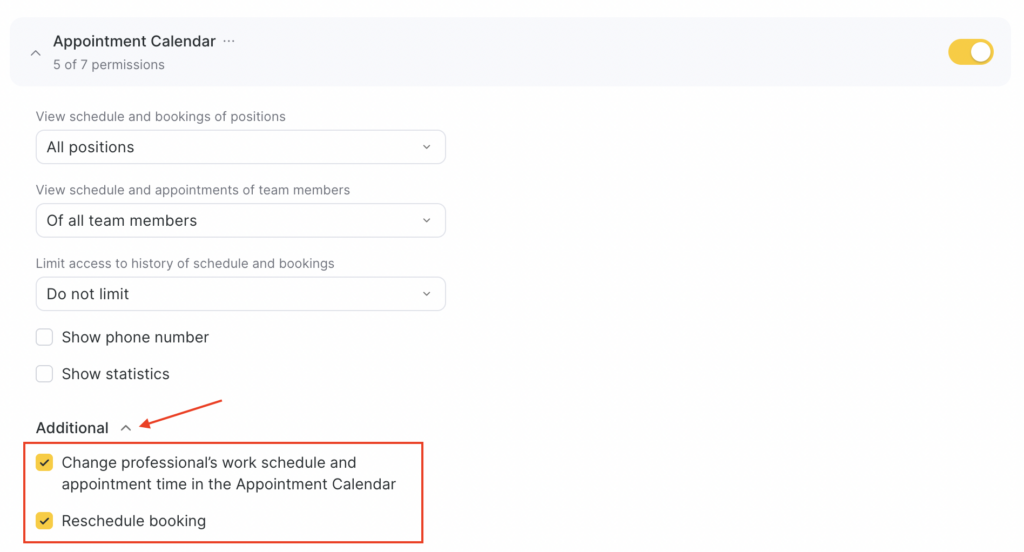
- To add additional access rights, click the arrow to the right of the switch and then click the “Additional” line. Select the required options or check the boxes in the drop-down list.
- To grant or remove rights for a section, click the three dots next to its name and select the required option.
- Click the Save button.
Copying access rights #
To avoid setting up the same access rights for multiple team members, you can copy permissions to another team member. You can copy permissions both when sending an invitation and for a team member who has already been added to a location.
To copy permissions:
- Go to Settings > Team, or Billing > Subscription> Manage.
- Click the team member’s name or role and open the Access tab.
- On the page that opens, in the Access rights field, click Copy permissions.
- Select a team member from the list whose permissions you want to copy (you can use the team member search). Click Apply.
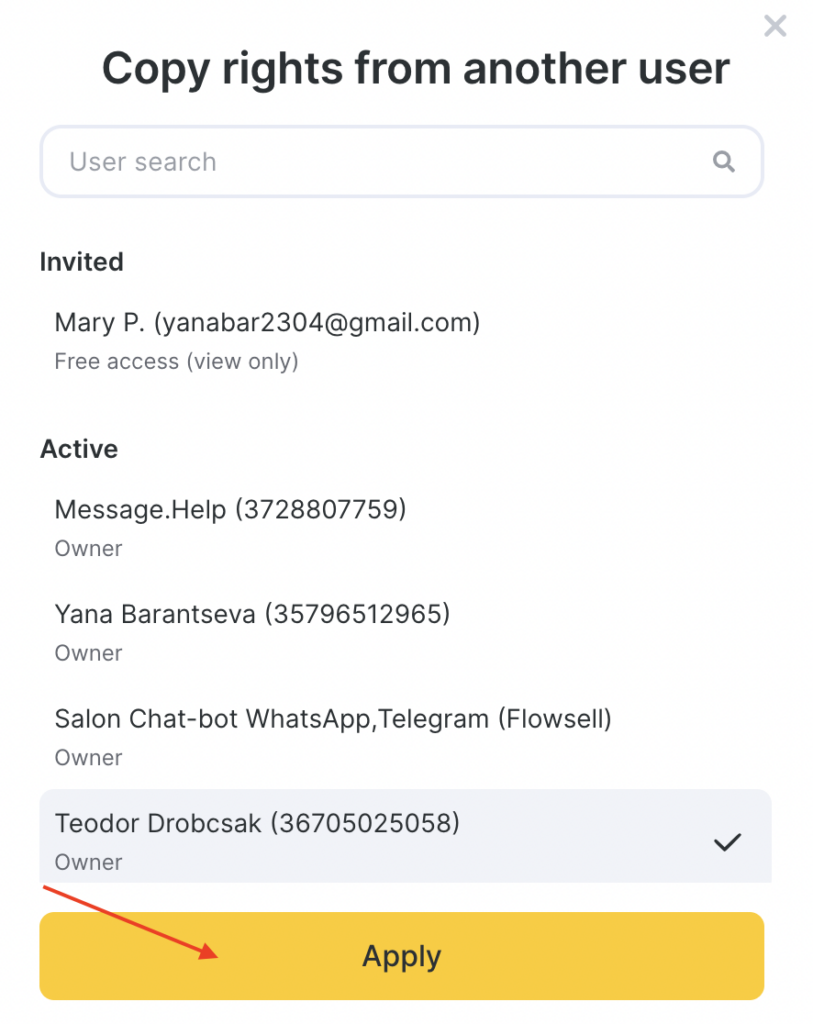
Afterwards, the copied rights will be assigned to the selected team member.
Editing a team member’s role and access rights in Billing #
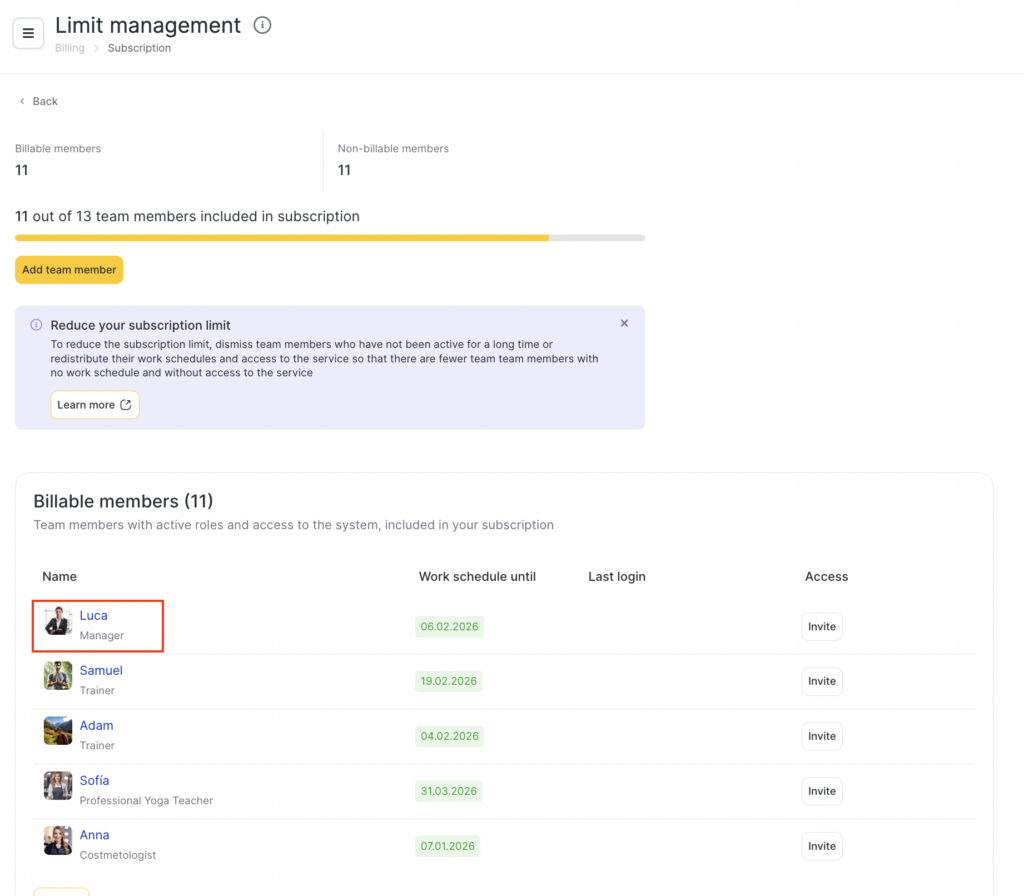
You can also edit team member roles and access rights in Billing > Subscription. If a team member was invited earlier but no role was assigned, you can assign one in this section as well. To do this:
- In Billing > Subscription, click Manage.
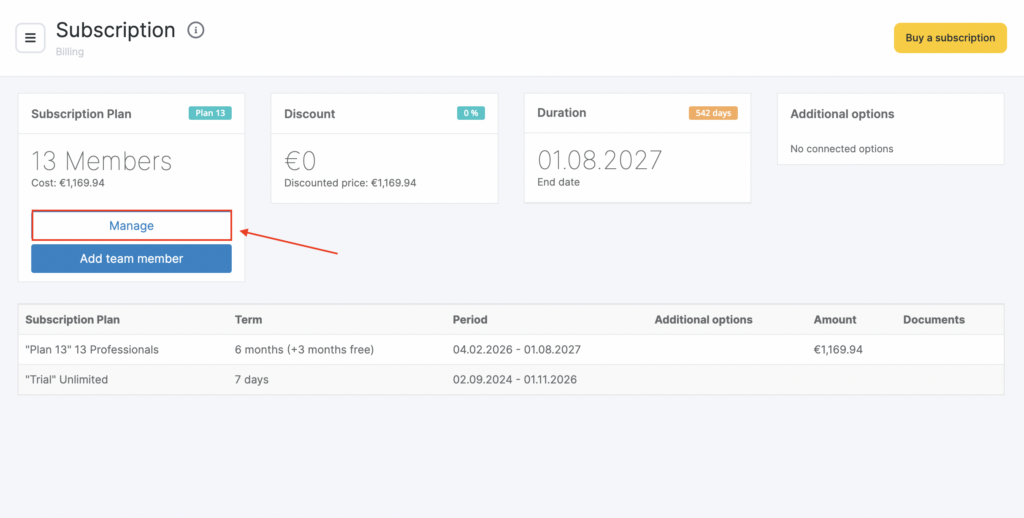
- A list of all team members will open. Click the name of the team member whose role or permissions you want to edit. The system will open the team member profile in the Team section.
- In the team member profile, go to the Access tab.
- Then follow the instructions provided earlier in this article.
Team member subscription status #
In the Team section, the Subscription column shows whether a team member is counted in the subscription and whether they are billable. There are two possible statuses:
- Paid — the team member is counted in the subscription and is billable.
- Free — the team member is not counted in the subscription and is non-billable.
If you’ve reached the team member limit in your subscription, you can increase it in Billing > Subscription. For details, see the article How to add additional team members to your plan.
Change a team member’s subscription status (Billable vs Non-billable) #
In the team list, open Team member settings (the modal with the subscription counter). Select: Billable member or Non-billable member. Click Save.
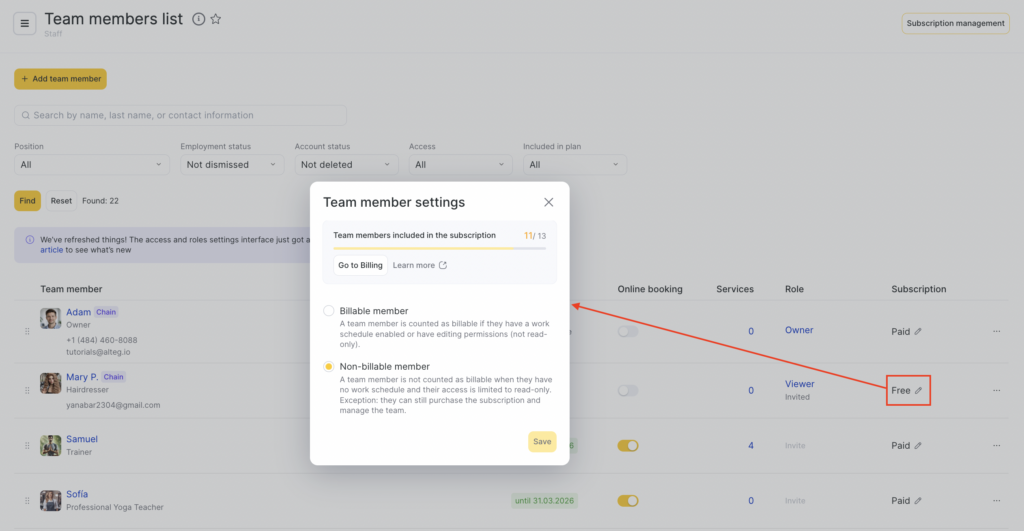
If you switch a team member to Non-billable, make sure that:
- they are not included in the schedule
- they don’t have any editing permissions (otherwise, they will become billable again).
Dismiss, delete, transfer access #
To dismiss a team member, delete them, or transfer access to another team member:
- In the team member list, open the menu by clicking the three dots (⋯) on the right.
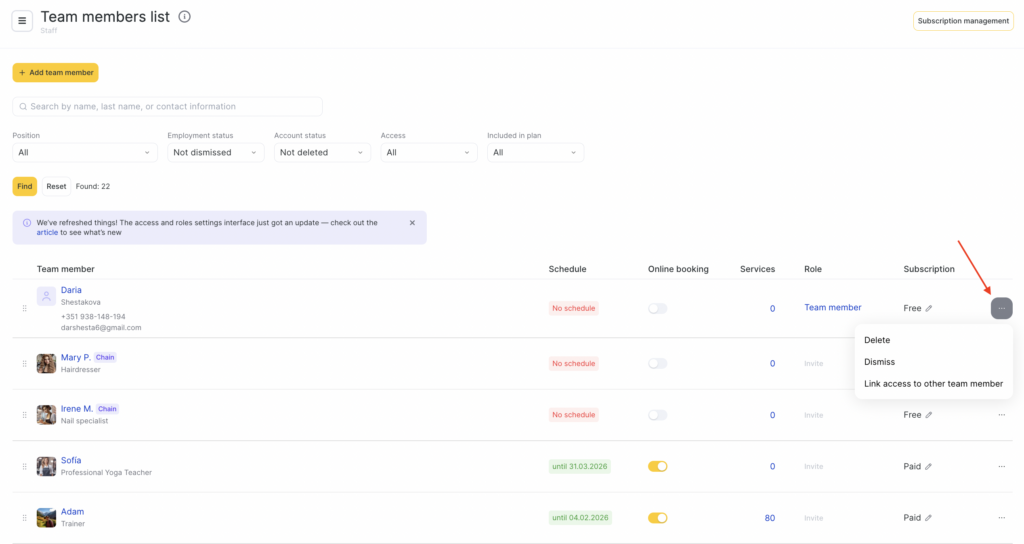
- Dismiss — use when the person no longer works with you. Their access is disabled, and they’re marked as dismissed.
- Delete — removes the team member from the location/system list (use carefully).
- Link access to other team member – Use this option if you need to move system access and permissions from one team member to another — for example, when you accidentally created a duplicate profile, or when a new team member replaces the previous one.
During the transfer, in the window that opens:
- Select team member without access
Choose the team member who should receive the access. Only team members who don’t currently have system access can be selected.
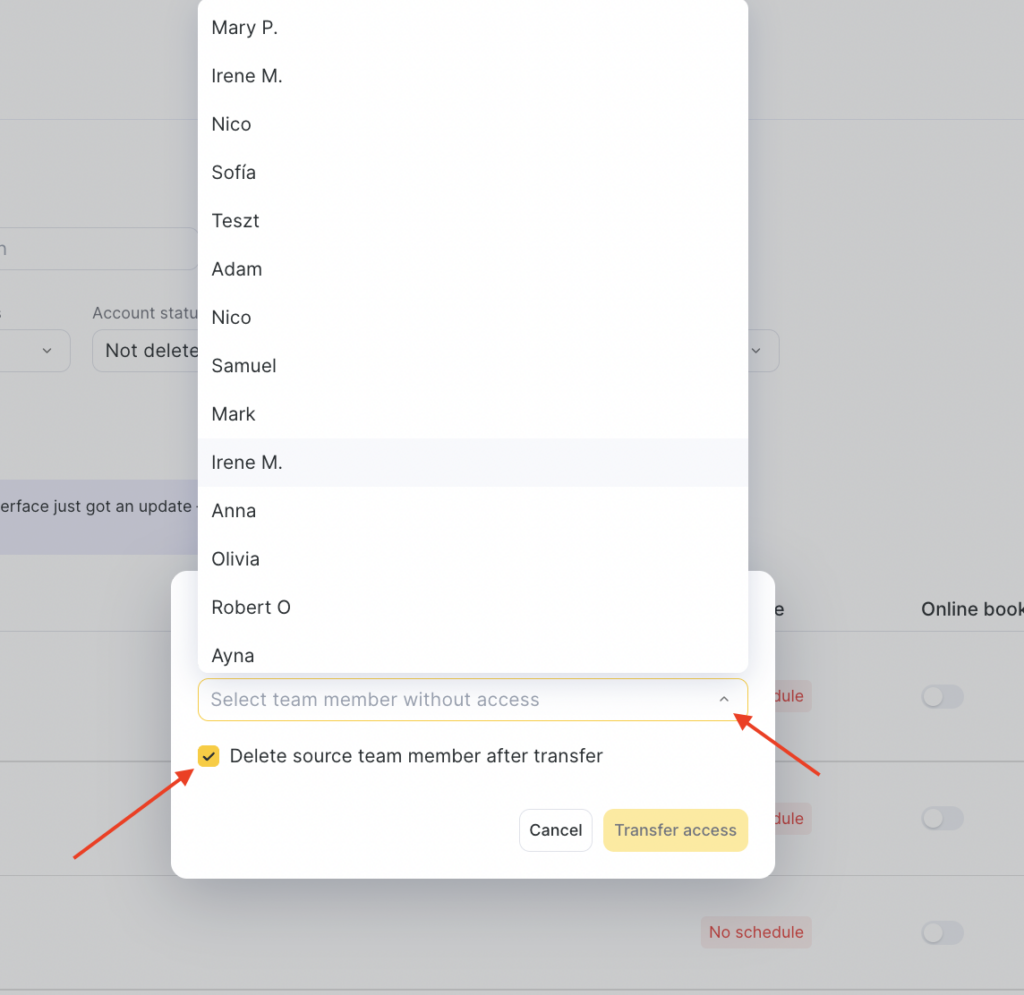
- Delete source team member after transfer
Enable this option if you want the original team member (the source) to be removed after the transfer. This helps avoid duplicates. - Click Transfer access to confirm.
Tips
If someone needs to work with bookings/payments/clients > they will almost always be billable.If someone only needs to view reports/metrics > use Viewer + Non-billable (and no schedule).
If someone only needs team + subscription management (but no schedule) > use System manager (non-billable receptionist scenario).
If your subscription limits the number of team members, adding a new one may require increasing the limit.


